|
Dana 44 Lockright Install One of my best and favorite modifications to date. Adding a Lockright to my rear axle has definately improved my wheeling. When I was looking for a locker, I spoke to many people to help me make my decision. In the end, I ended up going with the Powertrax Lockright locker. I got it for a hell of a good price, and it should serve me well until I'm ready to swap out my front axle. Unfortunately this article doesn't have as many pictures as I would have liked, but I was distracted during the install and forgot to take a lot more pictures. Let's get started. First things first, you need to remove the cover and drain the gear lube. If you can't do that, maybe you should have someone else install your locker for you.
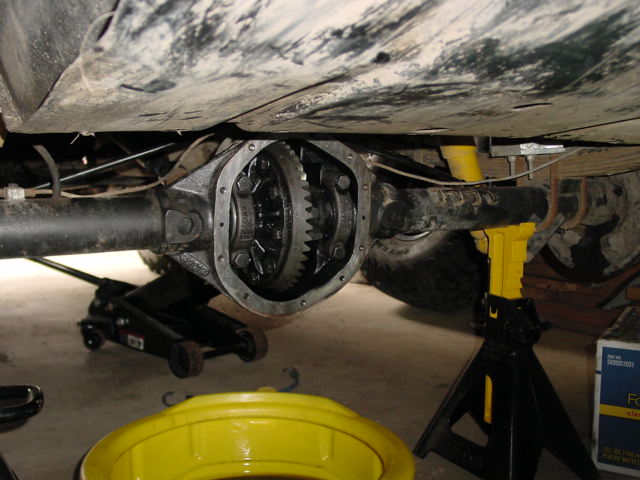
Next came the most difficult part for me. You have to remove the carrier. Remove the four bearing cap bolts. They are torqued to 70lb-ft. I suggest marking the caps so that you can remember their orientation (left-right and up-down) as they are line honed with the axle tubes. I also kept the bolts in order as well. To remove the carrier, I was told to use 2 large pry bars and to pry on the inside of the ring gear and a ring gear bolt on the back side. However, after trying this process for many hours, the only thing I accomplished was to mangle the inner edge of the housing and break 3 pry bars. Next, I was told to turn the pinion with a wrench and feed a rag into the ring gear. This would cause the carrier to pop out. It kind of worked a little, but not enough to get the carrier completely out. The process that finally worked for me, was I had to take a come-along and attach it to the carrier and to the hitch on my Jeep. Using the come-a-long, I was able to pop the carrier out, finally! 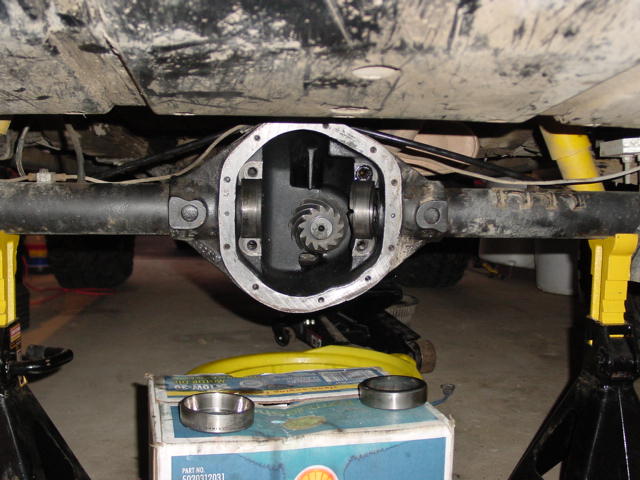
Once the carrier is finally out, the install of the Lockright finally begins. First you have to remove the ring gear. Before doing so, make sure that you mark the ring gear and the carrier so that you can install it back the exact same way it came off. Now you can remove all the ring gear bolts (I used an impact wrench which made this process quick) and the ring gear. You will probably need to use a flat screwdriver to seperate the ring gear from the carrier. Now you need to remove the roll-pin so that the cross-pin can come out. For this I used a hammer and a 4" long hex drive to hammer it out. Once it is removed, you can now drive out the cross-pin. Once the cross-pin is out, remove the spider gears. You can then push the side gears out. Do not forget to remove the thrust washers on the side gears. These will be reused unless damaged or cracked. There are also some cupped washers that were under the spider gears. Remove these, they will not be reused, but save them and the side/spiders as the Lock-Right does have a 2 year warranty and you can reinstall them if you have to. 
To begin the assembly, you need to apply some medium weight grease to both sides of the thrust washers, the teeth of the couplers and drivers, as well as in the small holes in the drivers. Also, fill the small oval "window holes" in the drivers with grease. This will be used to hold the pins and springs in place during assembly. There are two window holes on each driver, on opposite sides. Slide the shear pins into the small holes on the face of the driver that have a window hole. You should end up with 2 pins pushed in flush with each driver. Assemble the spings. Apply some grease to the larger springs and slide the smaller ones inside. The grease should help hold it all together. Place the thrust washers on the back of the couplers (side gears) and install into the carrier. Place the driver halves together with the spacers inside them, teeth out. Slide the drivers into the carrier. You will need to place one half at a time. Now comes the fun part of installing the springs. I have heard this can be a pain the ass, but it went pretty smoothly for me. Line up the drivers as best as possible. Using a small flat screwdriver, slide the shear pins from the window into the other driver. You may need to "wiggle" the other driver to get the holes to align. Slide all 4 pins over, 2 going left to right and 2 going right to left. Then, insert a spring set into the window hole and carefully compress it with the screwdriver to fit it into the hole. It should seat nicely behind the shear pin and be completely below the edge of the driver. Next install the cross-pin, making sure to carefully align the roll-pin hole to the carrier. Tap the cross-pin into the carrier and when the hole is nearly in the carrier, use a small center punch or pin to finish aligning the holes. Tap the cross-pin until flush with the carrier. Inspect the alignment of the holes and then install the roll-pin again. Finally, place the ring gear lossely onto the carrier. Turn the ring gear until the marks you made line up. Using three ring gear bolts, in a triangle pattern, pull the ring gear onto the carrier. Install the remaining bolts using the thread locker and torque to 55 ft-lb. Install the rear gear bolts in a star pattern to avoid warping anything. Remove the three bolts originally installed to seat the ring gear, apply thread locker and torque to spec. 
Next you have to reinstall the carrier back into the housing. In order to get mine back in I had to put a block of wood on the bearing races and hammer the carrier back in. 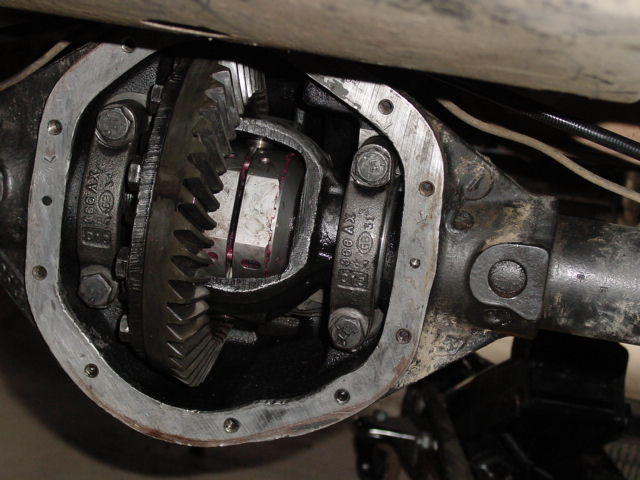
Last, test the locker's operation according to the manual and then put the axle back together! Enjoy your new locker!
|